
Where to install the HHO kit in my car
Where to install the HHO kit in my car?
One of the most critical questions regarding the installation. Simply because in today’s vehicles, there is not so much room for anything under the hood. Space for HHO Kit, it’s not something that the manufacturer prepared for us. If you are wondering, “where to install the HHO kit in my car.”
There are two possible ways of installation: Into the engine bay or in the trunk.
Both places have pros and cons, of course. The HHO kit should be in the vehicle’s body. Must be protected from upcoming wind, sand, heat, direct sun rays, stones, and so on. Check around the engine. In most cases, you can not just see it visually. You might have to remove some parts like plastic covers, over the engine, front bumper, or plastic inner fender above some wheel to be able to check it out. There could be some space.
Not possible?
Then you can think of mounting it in the trunk, as a second option. It’s preferable to be in front because of the charging system. You need all wires to be as much short as possible. It can be much easier for you when you have to do the wiring then.
Install it in the trunk; why not?
But there will be extremely long wires from the front to the backside of the car. I do not recommend in terms of the possible breaking of the cables, which must be secured! If it’s in the back, there is taking space form your trunk. In case of any gas leakage, there is no ventilation. The gas will be kept in the vault, which is not safe.
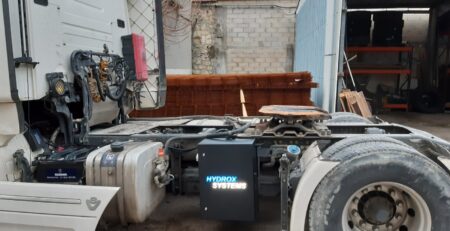
Before you proceed with the installation, have a look in the engine bay, the best place to mount the HHO kit.
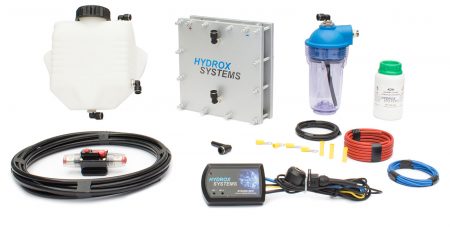
You have four main items that must be installed.
The first item that you have to mount is the HHO Dry Cell.
You can try between the cooling radiator and bumper. Make sure the Dry cell will be attached in a proper position and also well connected with bolts to the chassis. Besides, you must be able to plug the hoses into the Push-In fittings after the installation.
The second essential item is HHO Reservoir.
The only requirement is that the HHO tank must be installed on a higher level than the HHO Dry cell because the electrolyte must go into the Dry cell only by the gravity way.
The third item is the HHO Bubbler.
Regarding the HHO bubbler, it’s effortless to find a space, because this device is tiny. The only condition about the bubbler is that there is a small pipe comes out from the bottom of the HHO bubbler. This little pipe determines the maximum level of liquid inside, which is condensation water. Usually, it’s kept there to preventing this condensation water goes into the engine after long hours of operation. Just this small pipe sometimes is dripping off it to release the extra condensation water, the same as from the air-conditioner of the vehicle. Just be careful where you will install this HHO bubbler.
The last item that needs some space is Dynamic PWM.
A compact device so that you can find space for it. It must be in a dry and cool place in the engine bay. The most important must be accessible from you because, after installation of all items and connection of all wires, you will have to set up the Dynamic PWM. With the two hidden buttons on the Dynamic PWM, you can set it up via the manual for programming.
After finishing the installation in the vehicle of all hoses and wires you can prepare and fill it with electrolyte. The electrolyte is the raw material to produce HHO gas.
Advice: If you are handy and you have all need tools, you can do it yourself in less than two hours!
That is all when we are talking about light vehicles. Maybe it looks like too much info, but when you follow the manuals, it’s quite easy!